
Wanna Install Shower Drain Without Access Below? You’re not alone! Many DIYers struggle with this issue. No need to stress – this article has tips and tricks that’ll help you get it done without below access. Let’s begin!
Shower Drain Installation
Shower drain installation is an easy and important task during bathroom remodeling. In most cases, it’s very simple to install and requires no access below. Installing the drain without access below requires extra planning and the right tools and materials.
To install it correctly without access below, you need: the right measurements; a solid structure support or backing board; PVC pipe or similar material to reach the bottom of the shower floor; the right type of drainage pipe (ABS or brass); a guard or stabilizer for the PVC pipe/drainage pipe; caulk and/or sealant; and adhesive or tooling product.
How to Replace a Shower Drain From The Top

Replace a shower drain from the top? It’s easy! You just need a few tools. No need to go under the shower, which is usually a challenge. Pick a drain compatible with your plumbing and make sure it fits.
Clean the work area. Turn off the water. Drain the remaining water. Use a screwdriver to remove the existing drain. Scrape away old sealant or debris.
Choose your new shower drain. Make sure it fits. Bolt it down. Tighten the screws firmly, but not too tight. Allow room for silicone caulk. Let it dry. Test the new shower.
Compression Shower Drain
The compression shower drain is perfect for installing a drain without any access to the space below. It doesn’t require any cutting, as it fits snugly between the wall and floor. Get these things ready before installation: a special compression drain assembly, rubber gasket washers, plumber’s putty, pipe caulk compound and a hacksaw.
Follow the steps:
- Find the center point of the drain, 3-4″ away from walls and fixtures. Mark it on the floor.
- Cut one side of the finished wall above the marked spot.
- Put plumbers putty around any open joints in the existing piping.
- Place the flange over the opening. Make sure there is 1″ distance between fixtures. Secure with rubber gasket washers.
- Apply pipe caulk compound along edges and joints. Connect the top and bottom portions with the coupling nut. Follow the manufacturer’s instructions.
How to Install a Compression-Style Shower Drain
To install it, start by taking out the existing shower floor drain. Measure it and note the location, so you can get a new model. Then cut away tile or grout around the former fixture to make room for the new flange. Put plumber’s putty around the ring of the flange and secure it with screws.
Connect plumbing fittings according to instructions. Put silicone sealant on the underside of the drainage cover flange and place it in the shower stall floor. Then screw the nut onto the top of the drainage cover flange until tight. Remove excess silicone and let everything dry overnight.
How to Install a Solvent-Glued Shower Drain
When installing a shower drain, the solvent-glued method is often the best choice when no access is available below the floor. This method works especially well on vinyl floors as it eliminates the need to drill into the subfloor. Here are some simple steps to install a solvent-glued shower drain:
1. Mark the desired location of the drain on the floor and use a jigsaw with slowly narrowing blades to cut an opening.
2. Place a plastic shower pan liner underneath the opening, covering 4-6 inches on all sides. Secure it with duct tape or cement adhesive if needed.
3. Put the drain strainer over the opening, centering it. Glue it into place using a plastic solvent or epoxy made for PVC pipes as per manufacturer instructions. Allow 8-24 hours for drying.
4. Cut two slots into the tray flanges of the drain strainer at 45 degree angles so they fit around existing walls or floor panels. Lift the unit and secure it to the jigsaw cutout from beneath using the glue. Use metal screws to make it more stable. Mark the screws on the top surface of the flanges for future repair work. Allow 24 hours for drying before use.
Shower Drain Install From Top
First, attach the drain to the shower floor using silicone or putty. Make sure it is secured tightly. Then move on to the second step: connecting it to your drainage system. This could involve snaking a PVC line up through the wall cavity, cutting an opening in the ceiling, threading existing piping, and caulking once all connections are secured.
Keep in mind any local codes regarding installation. Also, make sure you have proper ventilation. Finally, tighten the connections using adjustable wrenches. Consider any technicalities, like differences in water lines beneath the shower base. Observe precautions when sawing tiles, since you may hit electrical components.
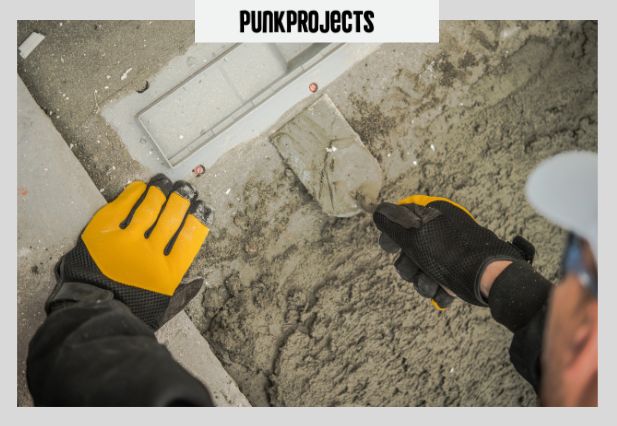
How To Install a Shower Drain in Concrete Floor
Installing a shower drain in a concrete floor is easy!
Measure the hole for the drain, considering the diameter and any special features. Cut the hole and use heating cable or caulk to place the pipe. Cover it with waterproof sealant before tiling. Secure the drain parts with waterproof screws or fasteners with seals.
Install Tub Drain Without Access Below
Start by drilling into your existing tiles with the hammer drill. You should have created a level hole that lines up with your existing plumbing subfloor cutout directly beneath tub decking.
Cover this hole with wax paper. Lower the joint P-trap into place alongside vertical standpipe section of pipework. These should line up evenly. Secure them together using elbows and connection nuts provided by the manufacturer.
Use sealant tape to make them water tight around their joints’ ends. Finally, secure all pieces using screws or other mechanical fasteners. Cover any exposed edges with waterproof mastic or silicone caulk atop seams between walls/floors fixtures.
Installing Shower in Basement on Concrete
Installing a shower in a basement on concrete can be challenging because of limited access to the drainpipe. But, you can install a shower drain without needing access below by using an access panel and flexible drain connectors.
Find a shower space with proper drainage and headroom for the access panel. These panels are either made of wood or metal, with removable doors for cleaning or repair.
Then measure the placement and drill your holes. Use masonry or carbide tip drill bit based on the material. Use plumber’s putty around any areas that could leak. Connect the P-trap, elbow fitting, and the flexible connector from P-trap up through wall and down into the floor.
How to Install a Shower in a Basement Without Drain
Installing a shower in a basement without access below? Difficult. But don’t worry, an above-floor drain assembly is the solution. Here’s how:
1. Buy the necessary parts: an above-floor drain base, extension nuts and washers, PVC piping, fittings, and a shower strainer/trap.
2. Clear 12 inch area around the future drain pipe placement. Cut away obstructions that prevent plumbing connections or installation.
3. Place the drained base at least 4 inches from any walls or framing members. Secure it with bolts and washers for stability. Make sure it’s level.
4. Attach PVC pipes from the shower strainer/trap up through the floor. Seal off additional openings with caulking or adhesive spray foam.
5. Test all components. Check elevation, direction, and bends to ensure proper drainage. Caulk all seams. Finish off with grout around tiles after installation.
Shower Drain Cracked
The first technique is the no-hub cone clamp banded adapter. Here, you need an existing waste line that goes up the bottom lip under the slab of your shower’s base. Cut the seal ring and plan the new drain before installation.
Put the rubber gasket over the waste pipe and seat it at the lower lip. Connect the steel collar and secure it with bolt screws. Tighten the nuts and screws from above to prevent movement and leaking.
The second technique is a compression-style connection. This uses an ABS/PVC drain, an ABS threaded converter and plastic compression fittings. Put the converter in place and add the compression fittings.
Use adhesive sealant for both materials and tighten them. This provides watertight insulation between the two elements and prevents leaking.
Frequency Ask Question
Can a shower drain be installed without access below?
Yes, it is possible to install a shower drain without access below, but it may require some additional steps and preparation. There are different types of shower drains available, including linear and point drains, which may have different installation requirements.
Can a DIYer install a shower drain without access below?
While it is possible for a DIYer to install a shower drain without access below, it may be more challenging than other plumbing projects. It is important to have a good understanding of the installation process and the necessary tools and materials. Additionally, it may be helpful to consult with a professional plumber or contractor to ensure that the installation is done correctly.
What are some considerations when installing a shower drain without access below?
It is important to ensure that the drain is installed correctly to prevent leaks and water damage. The shower pan should be sloped toward the drain to ensure proper drainage, and a waterproofing membrane should be installed to prevent moisture from seeping through the shower floor. It is also important to follow the manufacturer’s instructions for the specific type of drain being used.
What are some methods for installing a shower drain without access below?
One common method is to use a pre-manufactured shower base with an integrated drain system, which can be installed directly on the subfloor. Another option is to use an adjustable drain system that can be installed from above the shower pan, such as a compression or glue-on drain. For tiled shower floors, a bonding flange drain can be used, which can be attached to the shower pan liner before the mortar bed and tile are installed.
I am a multi-talented designer and contractor with over 10 years of experience in the field. I have a passion for creating beautiful, innovative spaces that reflect my clients’ needs and styles. My skills include architectural design, interior design, space planning, project management and construction supervision.